Color-grading can be a game-changer for your video projects, helping you transform your footage from ordinary to extraordinary. But with so many options for settings and adjustments, knowing where to start can be overwhelming.
In this article, you’ll learn how to color grade in Premiere Pro, including how to use the Lumetri Color panel to adjust tones, contrasts, and hues, so you can bring your creative vision to life.
What is color grading?
Color grading involves adjusting your video’s colors and tones to create a specific mood. In filmmaking, grading ensures that your scenes are consistent, appealing, and fit with the narrative’s emotional tone.
You’ll have seen movies with famous color grades—like Blade Runner 2049, The Matrix, or any Wes Anderson film. In these iconic movies, colorists applied bold effects and made their footage more visually engaging.
Here’s a montage of scenes from Blade Runner to highlight its unique, dystopian color grades that we predict will be a top video trend in 2025:
Color grading vs color correction
With color grading, you’re trying to achieve a specific look. It’s an intentional effect—whether it’s to bring attention to a character, set the mood, indicate a change in setting, or something else.
But before you apply your color grade, the raw footage needs to be natural and accurate. That’s where color correction comes in. It involves adjusting your colors to look as they should in real life. You tweak white balance, exposure, and contrast so skin tones, skies, and other elements appear true to life. Once you complete this process, then you can move on to color grading.
How to color grade in Premiere Pro
Premiere Pro isn’t quite as powerful as DaVinci Resolve at color grading, but it’s intuitive and nowhere near as daunting as it first appears. Here’s how to color grade video in Premiere Pro:
1. Add an adjustment layer over your clip
The first step in color grading is to add an adjustment layer over your clip. This will let you apply effects and color corrections without altering the clip itself, giving you more control over the color grading process. You can also drag the adjustment layer across several clips—this is how to color grade multiple clips in Premiere Pro at once.
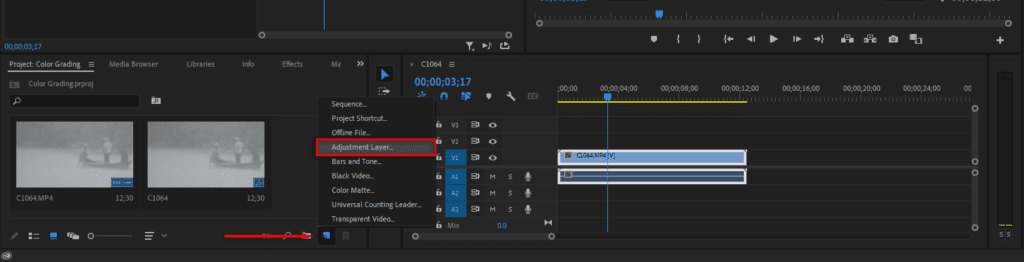
To add an adjustment layer, go to the Project panel and select New Item in the bottom-right corner. Select Adjustment Layer from the menu, ensure the settings match your sequence, then select OK.
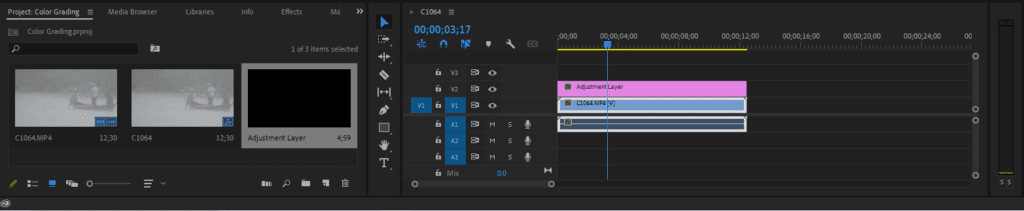
Next, drag and drop the adjustment layer onto your sequence, above your footage.
2. Open the Lumetri Color workspace
For color correction and grading, you need to use the Color workspace. Press Window and select Workspaces > Color. You’ll see a new panel full of sliders on the right-hand slide—the Lumetri Color panel. On the left, you’ll see the Lumetri Scopes.
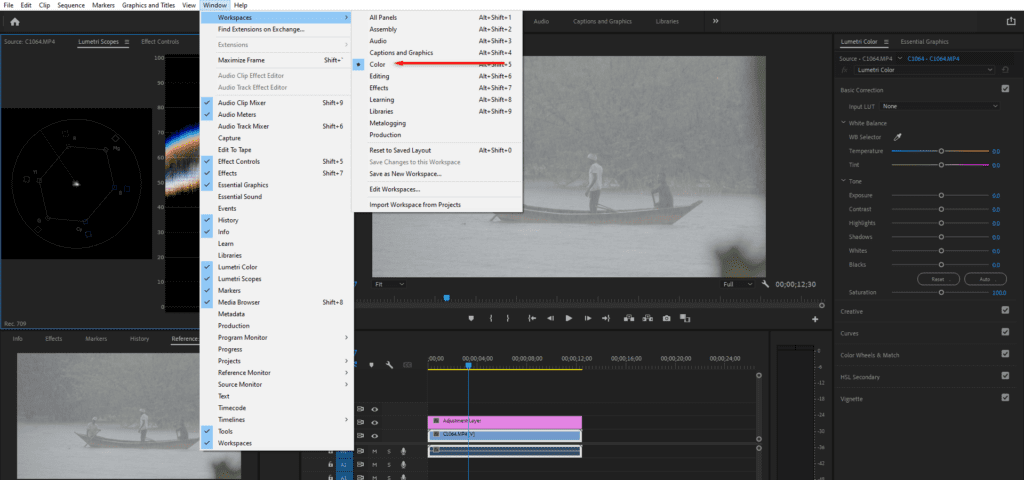
The Lumetri Color panel lets you adjust colors, brightness, saturation, and contrast to enhance your footage. The Lumetri Scopes, on the other hand, include waveform monitors, vectorscopes, and histograms, which offer detailed insights into color balance and exposure levels.
3. Apply basic color correction
Now it’s time to color-correct your footage. Start by selecting the Adjustment Layer over the clip you want to correct—this will ensure that any changes made in Lumetri Color apply to that clip.
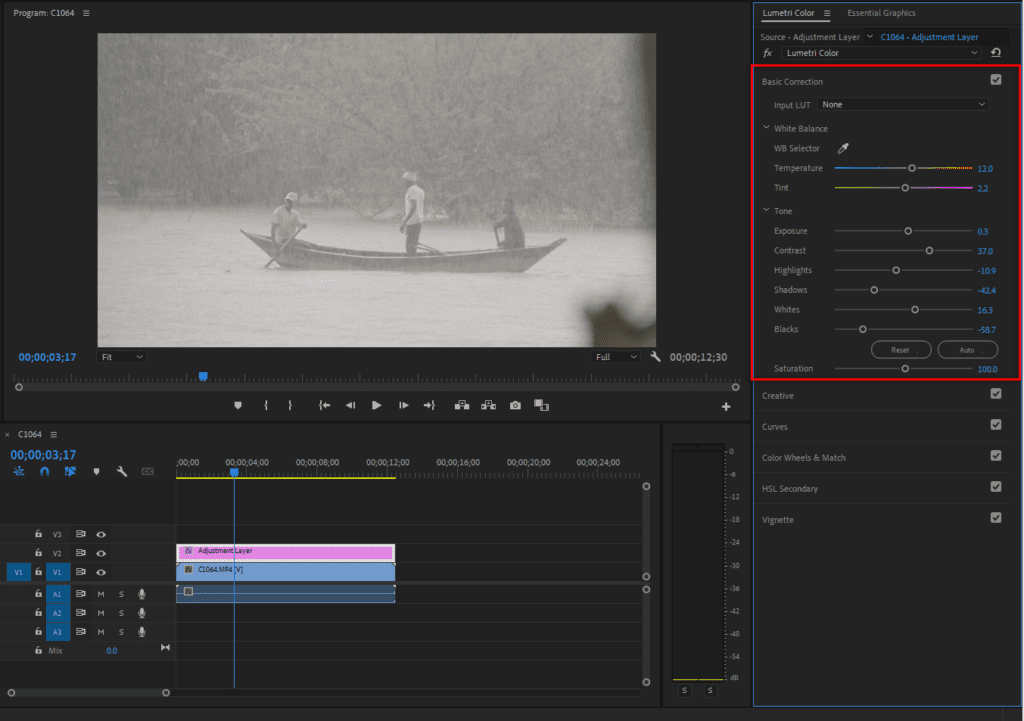
Next, navigate to the Lumetri Color panel. All of the color correction tools are under the Basic Correction tab. Here’s what to do:
- White balance: Use the Temperature and Tint sliders to adjust the overall warmth or coolness.
- Tone sliders: Adjust Exposure, Contrast, Highlights, Shadows, Whites, and Blacks to balance the brightness and achieve a good tonal range.
- Saturation: Increase or decrease the overall color intensity.
Note: If you’re not sure where to start with color correction, check out our in-depth guide on the basics of color correction in Premiere Pro.
4. Apply creative adjustments
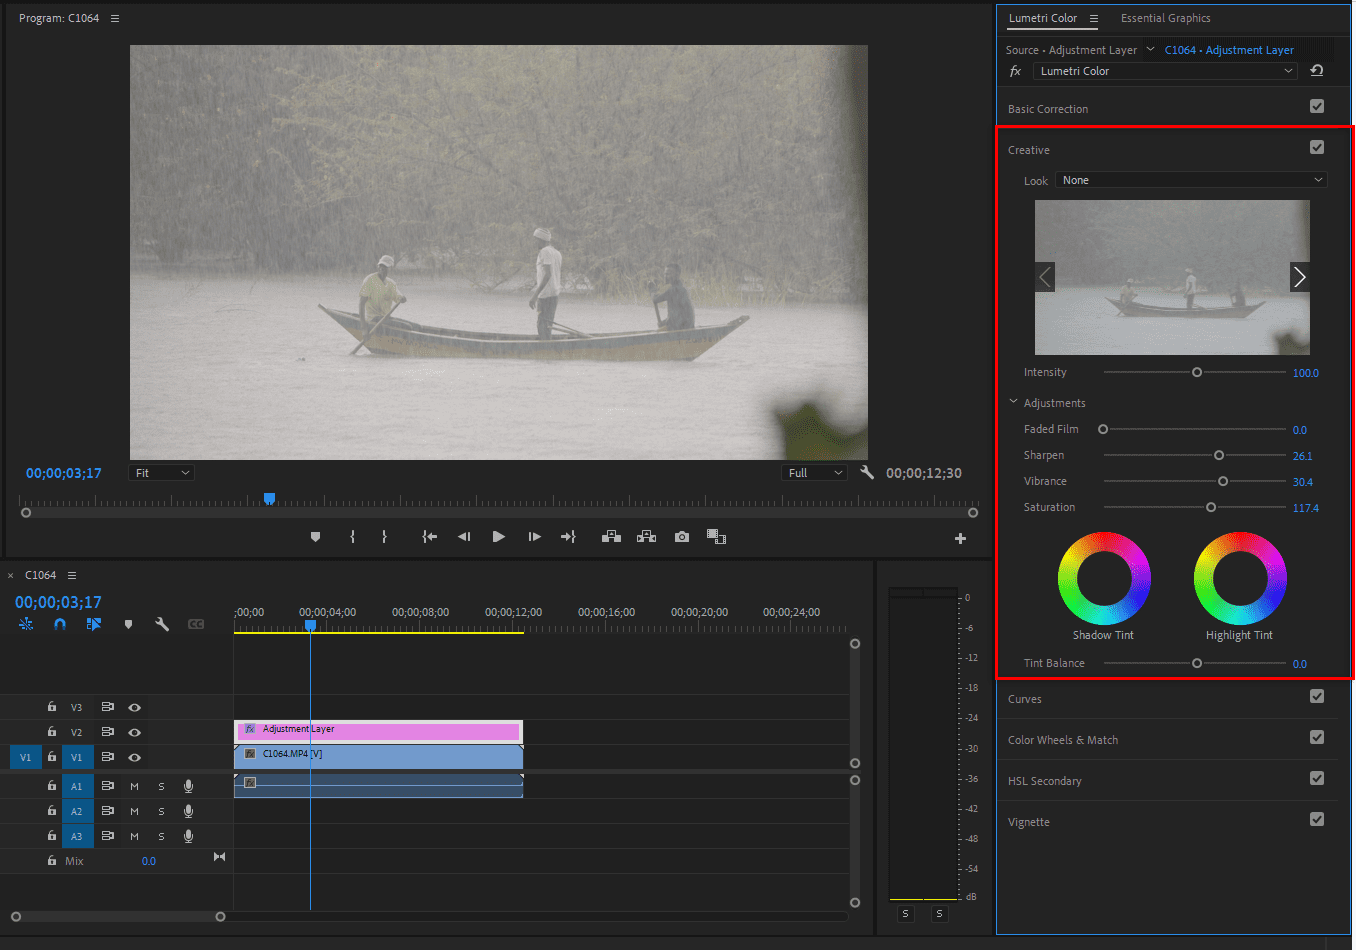
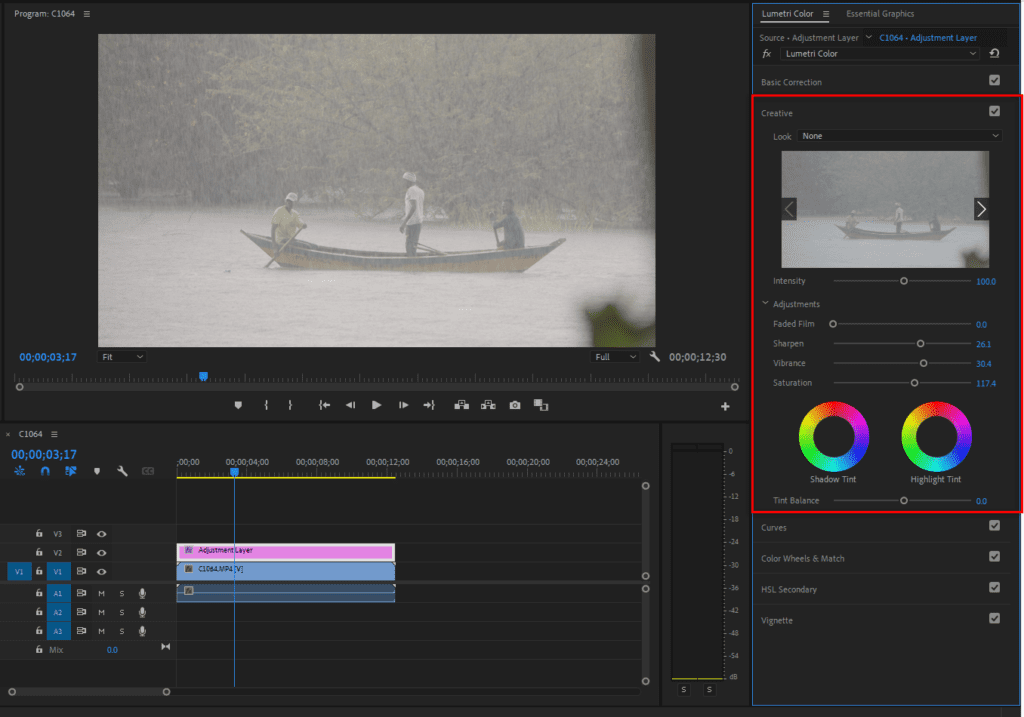
Once your footage looks accurate and natural, it’s time to apply your color grade. First, open the Creative tab underneath the Basic Corrections tab in the Lumetri Color panel. Here, you can:
- Add a Look or LUT: Press either drop-down menu to add a Look or LUT. If you don’t know what these are, we’ll explain how to use LUTs for color grading in the next section.
- Create a faded film look: Add a retro look to your footage by increasing the fade slider.
- Sharpen adjustments: Enhance the detail in your video by sharpening the image.
- Increase vibrance and saturation: Further adjust the color intensity, especially for desaturation or other subtle changes.
5. Use curves to fine-tune your tones
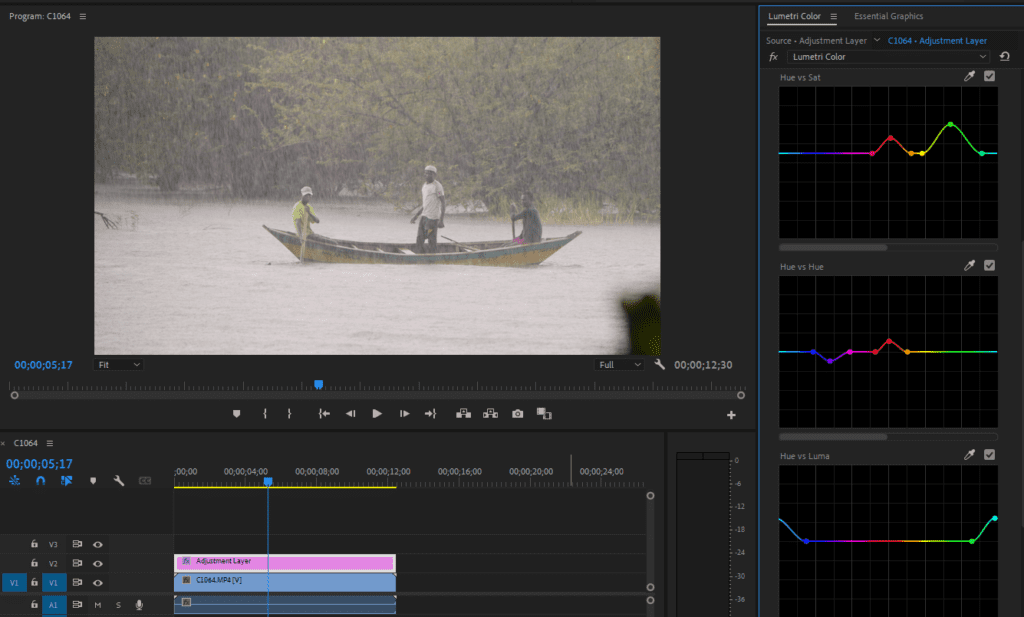
Premiere Pro’s curves—the RGB curve and Hue curves—let you manipulate the image’s color and brightness levels.
The RGB curve lets you change individual color channels (red, blue, and green) to balance colors. Create control points along the RGB curve by clicking on the line.
Drag the control point up to increase the brightness in that region, or drag it down to decrease the brightness. To change your shadows, adjust the bottom-left part of the curve. To change your highlights and whites, adjust the top-right part.
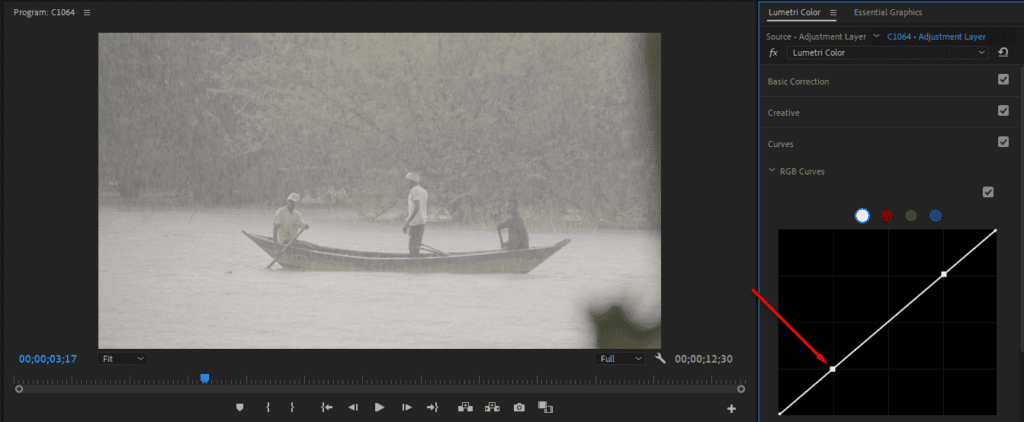
For example, raising the red curve adds warmth, whereas lowering it cools the image down. Moving the curve while selecting all channels at once (the white option) lets you adjust global values.
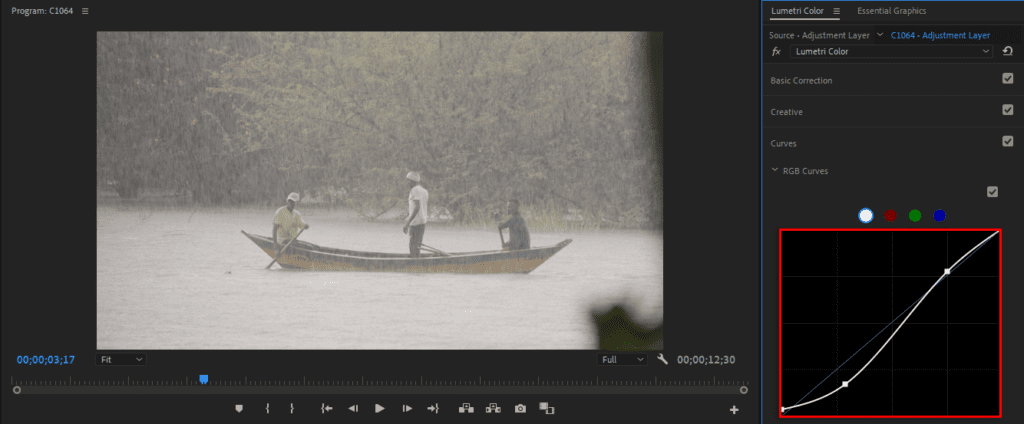
Here’s what the other curves do:
- Hue vs. Hue: Adjusts specific hues within the image. Select a hue to shift and drag upwards or downwards to change its tone.
- Hue vs. Saturation: Change the saturation level of specific hues without affecting others. Ideal for boosting or muting specific colors.
- Hue vs. Luma: Adjust the brightness of certain hues. Useful for balancing how bright or dark a color appears compared to the rest.
6. Use the color wheels to match your clips
Color wheels adjust the color balance within the shadows, midtones, and highlights. Each wheel represents a different tonal area. The Shadows wheel adjusts the darkest parts of the image, while the Highlights wheel targets the brightest areas.
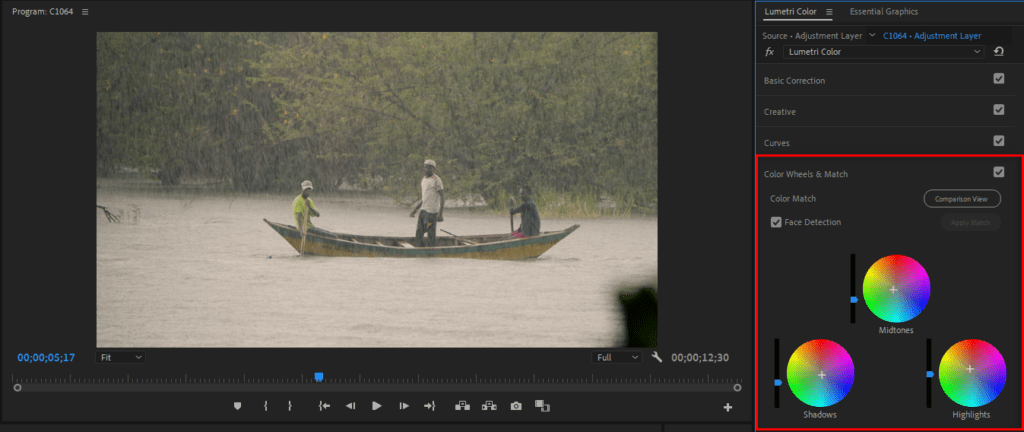
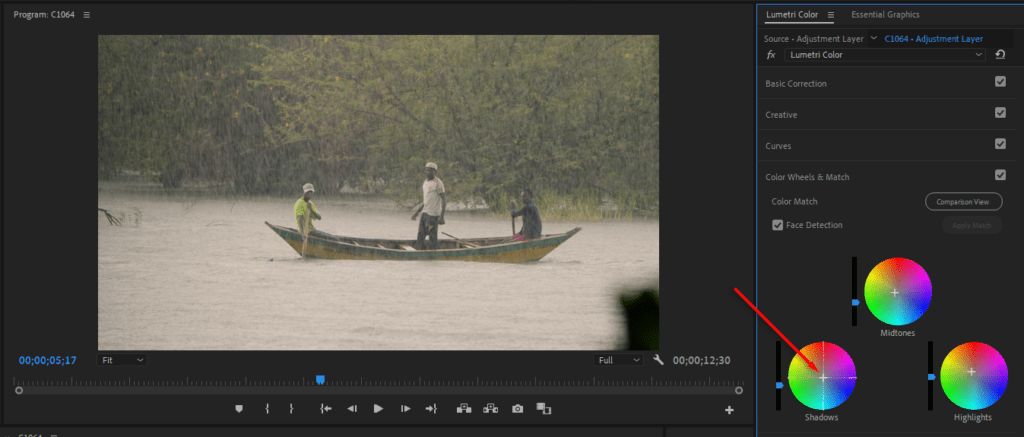
Move the control point in the center of each wheel towards a color to shift those tones in that direction. This allows you to warm up, cool down, or correct color casts. The Balance slide lets you shift the overall color balance, while the Gain slider controls the intensity of your changes.
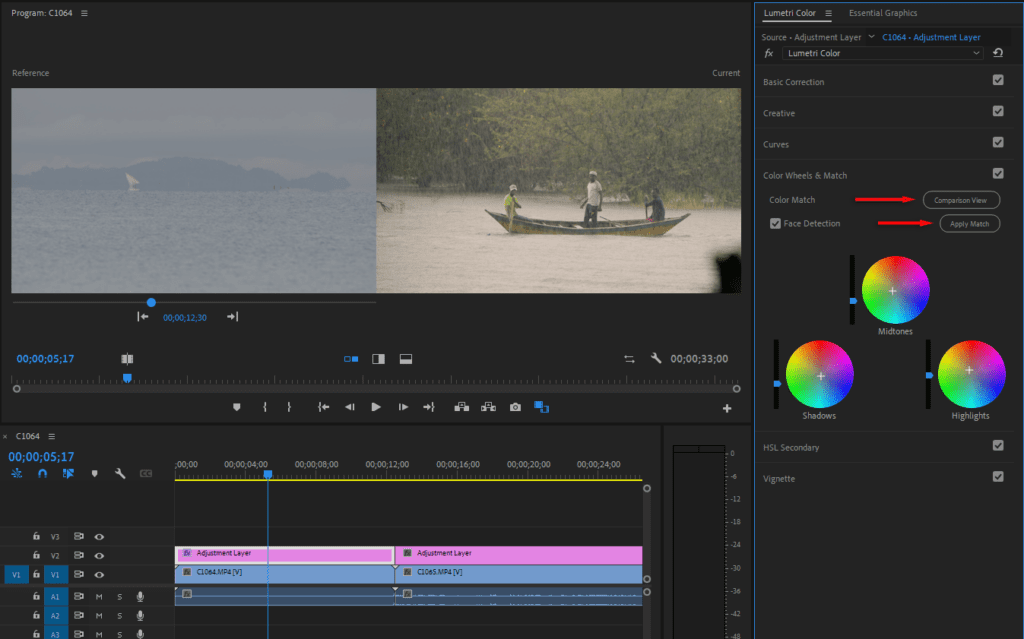
In this panel, you’ll see the Color Match option. Use this to automatically match colors between two selected clips, ensuring that your color grade remains consistent.
7. Use the HSL Secondary tab to add the final touches
The HSL Secondary feature lets you isolate colors or color ranges and apply targeted changes. Use the Color Picker Tool to select the color you want to isolate, then use the correction slides to alter its appearance.
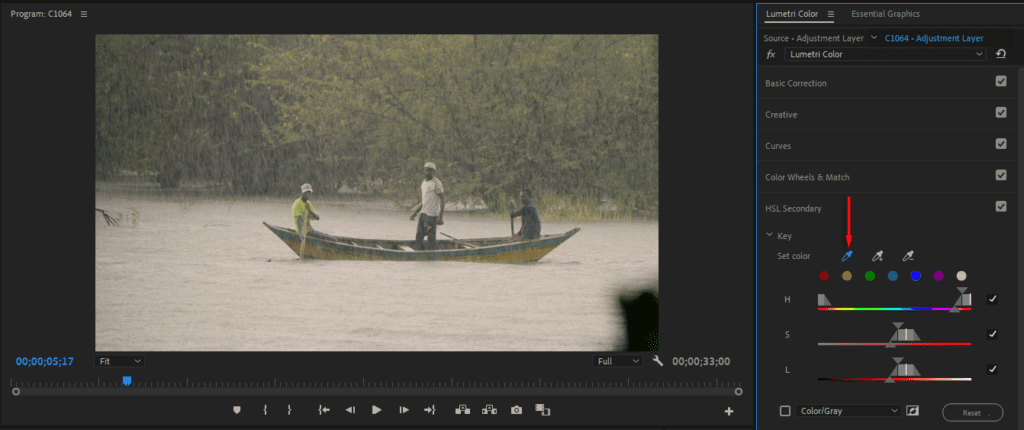
Here’s how they work:
- Hue: Shifts the hue of the selected color range to a different color.
- Saturation: Increase or decrease the color’s intensity.
- Luma: Make the color range brighter or darker.
When you’re finished, use the Lumetri Scopes to ensure your color grading choices have a balanced exposure and color distribution throughout the clip.
Using LUTs for color grading
LUTs are a quick and easy way to color grade your videos with specific color presets. To use a LUT in Premiere Pro, open the Color workspace and navigate to the Basic Correction tab.
Select the Input LUT drop-down menu and choose from Premiere Pro’s built-in LUTs or select Browse to add a custom LUT from your computer.
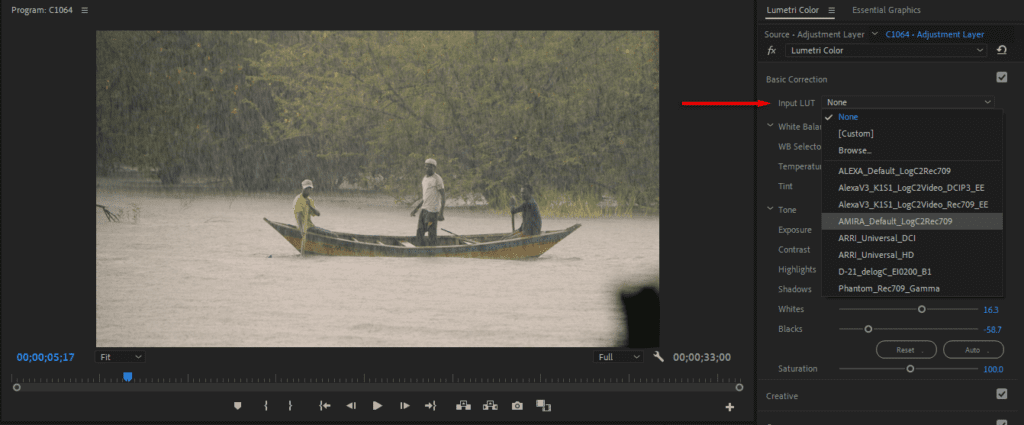
Selecting a LUT will immediately alter your footage’s colors according to the LUTs design. After applying the LUT, you may need to make additional corrections under Basic Correction, Creative, or Curves to ensure the overall look fits your project’s style.
If Premiere Pro’s LUTs aren’t cutting it, check out our library of LUT templates for Premiere Pro to find the perfect look for your project.
Premiere Pro plugins for color grading
If you’re looking for more advanced color correction and stylization, color grading plugins are a great option. These plugins provide specialized tools and features, including LUTs, advanced color wheels, and unique effects, to help you achieve professional-grade visuals.
Color grading tips
To achieve great color grading in Premiere Pro, follow these best practices:
- Focus on maintaining realistic skin tones: Use HSL Secondary controls to isolate and adjust skin tones carefully, ensuring they aren’t overly saturated.
- Match color grading between different scenes: Use Color Match to align colors between scenes, especially when filmed under different lighting conditions.
- Preview on multiple devices: Test your graded footage on different screens, including computers, TVs, and smartphones, to ensure color consistency.
- Experiment with LUTs: Try different LUTs to explore various styles. Apply them early to see how they affect your footage and adjust their intensity for the desired effect.
- Use subtle effects: Be cautious with how intense your color corrections are to avoid unnatural looks. Subtle adjustments often lead to more visually appealing results.
Final thoughts
Good color grading is one of the main differences between amateur and professional films. Luckily, the Lumetri Color Premiere Pro workspace makes it easy to adjust your colors and achieve a specific mood in your next video project.
To streamline your editing, consider a subscription to Storyblocks. With one subscription, you’ll get unlimited downloads of pre-made, customizable templates and LUTs for Premiere Pro, along with access to over 8 million stock assets. With access to high-quality stock footage, music, templates, and more, you can significantly speed up your workflow and bring your projects to life.


