If you’ve ever spent time shooting the perfect footage only to import it and discover that has digital noise, you’re not alone. While it can be frustrating, it doesn’t mean that you can’t rescue your shots. With the noise reduction tools in DaVinci Resolve Studio, it’s simple to clean up your footage.
In this tutorial, we’ll walk you through two options for applying noise reduction to video through the Color page in DaVinci Resolve. Keep reading to learn how, or watch the video tutorial below.
How to add noise reduction in DaVinci Resolve
Before we get started, it’s important to note that the noise removal tool is only available in the Studio version of DaVinci Resolve. If you only have the free version, you won’t be able to access it.
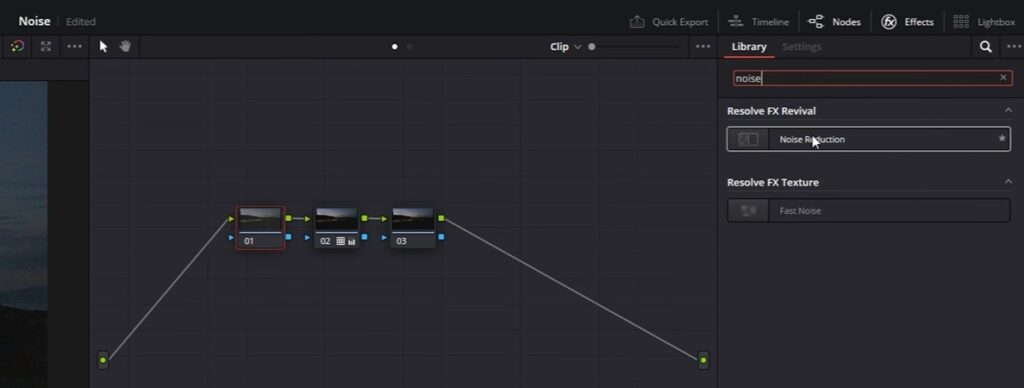
On the Color page in DaVinci Resolve, there are two places you can find the noise reduction tool. The first is in the OpenFX Library. Open the Effects panel, search for noise reduction, and then add it to an empty node.
The second and more traditional method is through the Motion Effects Panel. You can find this panel on the toolbar below the preview window, the icon is to the right of the primary adjustment area as highlighted below.
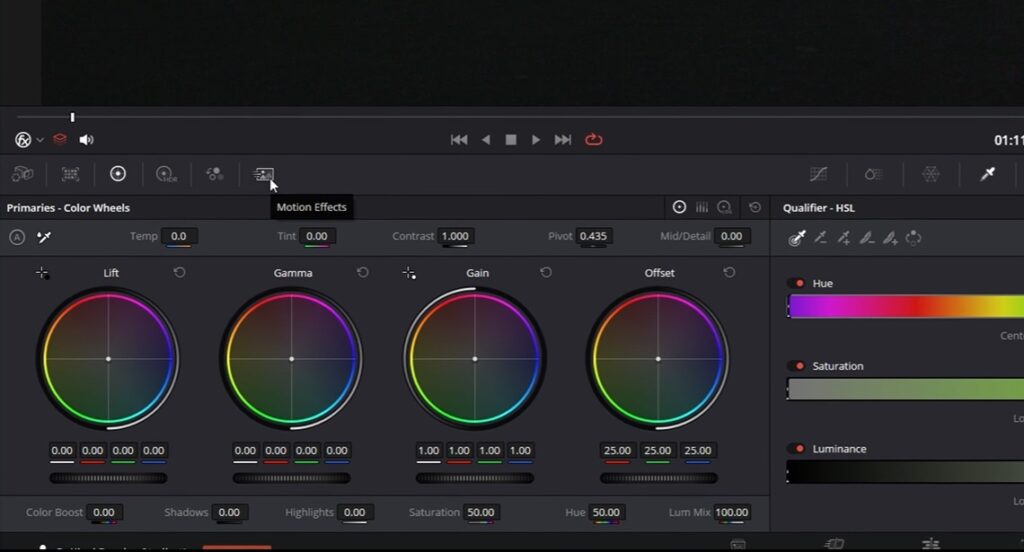
Both of these options will create the same parameters for applying noise reduction. But the Motion Effects panel adds noise reduction directly inside the active node you added it to. If you choose to apply it from the Effects panel, you need to add the effect to a specific node.
Tip: Apply noise reduction before you color grade
If you’re wanting to add noise reduction to your footage, you should apply it to the very first node at the beginning of your color grade process. Tackling noise before you add any other color adjustments prevents you from potentially making the noise worse and harder to remove.
Understanding the different noise reduction settings
If you were expecting a step-by-step tutorial on how to apply noise reduction, unfortunately there’s no universal process or setting you can use. Every clip, and each camera, has its own noise characteristics, so the settings you use will be unique to the type of noise you’re dealing with.
But to help you understand how each category within the different noise reduction settings work and what the parameters are, we’ll break each of them down so you can understand how to use them. As you experiment with each setting, be sure to check the reference in the preview monitor to see how each one impacts the noise in your footage.
For the examples below, we’ll be using the Motion Effects panel settings.
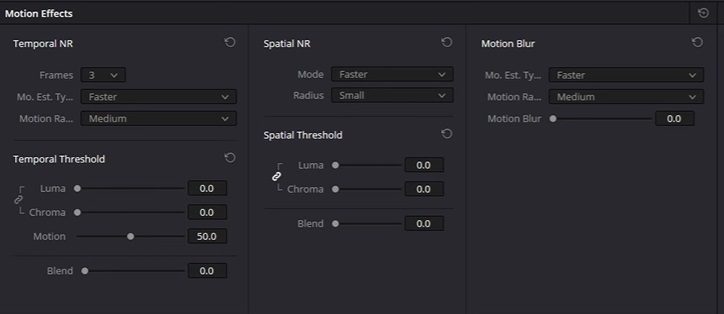
Temporal Noise Reduction
For our first explanation, we’ll be looking at the settings under Temporal Noise Reduction. This works by analyzing frame-by-frame data and isolating noise based on the detail Resolve sees across them. How effective this process is depends on the specific settings you use, which are outlined below.
Frames
For the Frames setting, you can choose anywhere from 1-5 frames for Resolve to analyze. Selecting more frames helps it better understand what’s staying consistent between each one, so it can more accurately identify noise. But as a downside, if you select more frames, that requires more processing power which can lead to motion blur artifacts in fast-moving scenes.
Start off with choosing 2 or 3 frames, then increase the number if you’re still seeing noise in your footage.
Motion Estimation Type
This setting impacts how Resolve interprets movement in the footage you’re trying to reduce noise on. The options for this setting are:
- Faster: Less accurate, but quicker processing. Ideal for shots with minimal motion.
- Better: Most accurate, with higher-quality results, but requires significant processing. Best for complex scenes with higher motion and noise.
Motion Range
Changing this setting tells Resolve how much motion to expect in your footage. Use a smaller range for footage with subtle motion to help reduce artifacts. A high motion range is better for more dynamic scenes, but it can also soften fine details.
Temporal Threshold
Luma
This setting reduces noise in the brightness channel specifically. If you set it too high, your footage can end up with plastic-looking or smoothed-out details.
Chroma
The Chroma setting reduces color noise, which typically shows up as splotches of different colors on your footage. Increasing this helps clean color noise without any noticeable changes to the sharpness. Chroma is useful for more damaged media with very obvious noise artifacts.
Spatial Noise Reduction
Spatial noise reduction works by focusing on analyzing individual frames to smooth out noise on each individual pixel.
Mode
The different modes within spatial noise work with the radius and have a different approach.
- Faster: Best for low-noise footage, less processing-intensive.
- Better: A good balance of quality and speed that works for most use cases.
- Enhanced: Ideal for challenging, high-ISO footage with a heavy processing cost.
- UltraNR: The highest available setting. Best for the noisiest footage, since the results can cause extreme smoothing. This mode is typically used for saving very damaged footage.
Radius
The radius setting defines the area of pixels that will be analyzed for noise with three different options to choose from.
- Small: Preserves the most detail, but only slightly addresses noise.
- Medium: Best for keeping fine details while reducing graininess.
- Large: Can effectively smooth out high-frequency noise, but can create smooth or blurred edges.
The Luma and Chroma settings under Spatial Threshold function the same way as under Temporal Threshold, but applied to individual pixels.
Learn how to do even more in DaVinci Resolve
Noise reduction is just one the many steps that comes with editing footage in Resolve, and the beginning of the color grading process. We have tutorials to help you with DaVinci Resolve, including using LUTs, fixing lag, exporting, keyboard shortcuts, and much more.
If you’re looking for ways to speed up your editing in DaVinci Resolve, pre-made templates are a great option to help you save time. Easily add in advanced effects and motion graphics in just a few clicks with the wide selection of professional DaVinci Resolve templates available in our library.
With a Storyblocks subscription, you get unlimited downloads of not only templates, but 4K and HD footage, music, images, sound effects, motion graphics, and more. Sign up today to start downloading!


