There are three times in which you make a film or video: when you write it, when you shoot it, and when you edit it. As Walter Murch, the editor of Apocalypse Now and The Godfather puts it, “The final rewrite of any film takes place in the editing room.”
If you aren’t clued in on all of the latest film editing techniques for video creation, it might be holding your project back. Whether you’re making feature films, YouTube videos, or anything in between, editing is essential to successful storytelling. In this article, we’ll cover 10 different editing techniques in film that you can apply to your own videos to improve your final cut.
Table of contents
What is film editing?
One thing the most highly regarded filmmakers and content creators have in common is that they all understand that editing is an art form. Your footage is a shapeless block of clay waiting for you to sculpt it. Throughout the editing process, your ultimate goal is to weave shots and scenes together into a compelling story.
Film editing is where you put all the puzzle pieces of your footage together. But simply sticking segments back-to-back in chronological order isn’t going to cut it. Film editing is elegant. Doing it well requires you to consider not just how scenes flow together, but also the look and feel of multiple individual cuts throughout every sequence.
Editing can make or break the entire tone of a production. And in some cases, it can even cause stronger emotional reactions, such as the Kuleshov effect. That’s why editors often work closely with directors to make sure they stay on the same page as the project takes shape.
Of course, art is subjective, so there’s really no “right way” or “wrong way” to approach film editing. Editors and directors bring unique perspectives to a project, and different combinations of vision will yield different forms of creative alchemy. That’s why two (or more) different editors will land on very different results — even when they both use the duplicate footage.
There are plenty of established best practices and techniques top creators have used successfully over time. Still, in the end, your creativity is in the driver’s seat of your project when it comes to developing your own unique video editing style.
10 film editing techniques
Today, there are many different types of film editing techniques you can deploy to achieve various effects that will help bring your message to life on the screen, from different kinds of cuts to transitions. Let’s have a look at what they are.
1. Standard cut
As the name suggests, the standard cut is one of the most commonly used editing techniques for video creation. It’s a no-frills editing technique you’d use to connect two scenes or between shots within a dialogue sequence.
Even when you just drag and drop your video clips into the timeline without care, if clip B plays directly after clip A, that’s technically an edit.
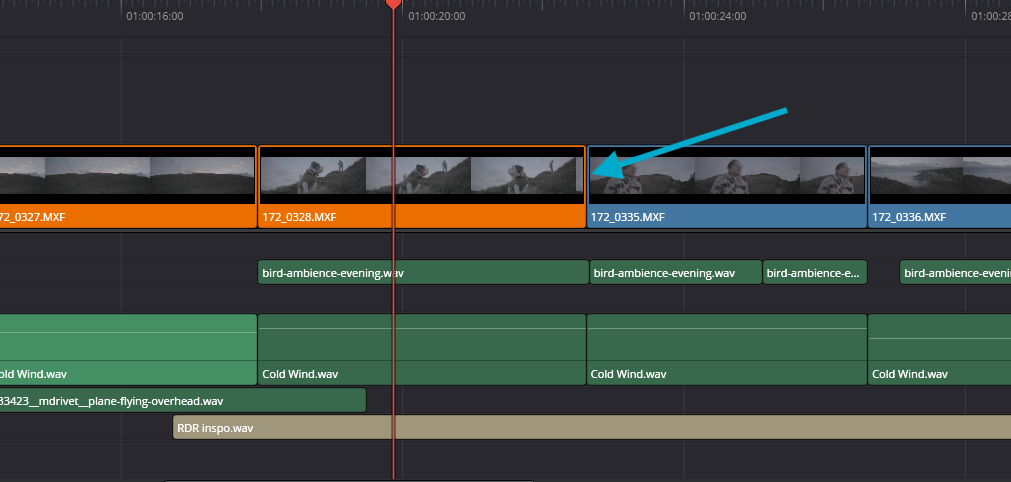
Knowing when to cut
But even with something like a standard cut, editing is rarely simple. While many believe it’s nothing more than keeping in the “good” content and getting rid of the “bad bits.” But even if you think of it that way, how exactly do you determine the good from the bad?
Walter Murch actually laid out a way to determine where you should cut in his book, “In the Blink of An Eye,” which provides insights into the editing process (and makes a great addition to any editor’s library.).
Murch outlines six essential concepts that should be met to help select the best moment to cut:
- It stays true to the emotion of the moment.
- It moves the story forward.
- It occurs at a rhythmically interesting and “right” moment.
- It respects “eye-trace,” the audience’s focus within the frame.
- It respects the two-dimensional plane of the screen (the grammar of three dimensions captured by a camera).
- It respects the three-dimensional space and the physical continuity of characters’ positions in relation to one another.
Of course, while this list seems ideal to follow, it’s not too often in filmmaking that the stars align the way we want them to. Therefore, if the edit cannot meet all six criteria, he suggests prioritizing the cuts by the following principle:
- Emotion: 51%
- Story: 23%
- Rhythm: 10%
- Eye-trace: 7%
- Two-dimensional plane: 5%
- Three-dimensional space: 4%
You simply move down the list when a particular principle cannot be achieved.
2. L cut
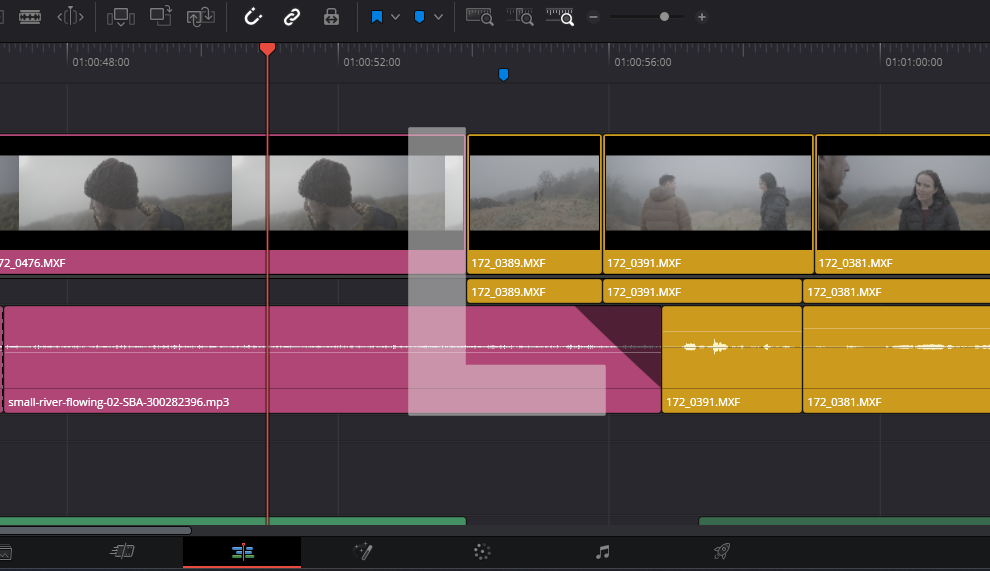
Now, let’s talk about a different kind of cut. In a standard video editing cut, both the audio and video from a single scene are usually cut at the same point. Visually, it looks like the screenshot below – I’ve colored the clips from scene 1 pink and the clips from scene 2 yellow.

With an L cut, a clip’s audio track continues playing as the visual components of the following clip come into view. Below, you can see how an L-cut looks on the timeline, with an L placed over the cut for visibility.
An L-cut is often used for emotional effect. For example, imagine a police officer speaking to a victim’s family in a dimly lit room, and the father says, “You never even looked for him!” Then we cut to the officer in his car, smoking a cigarette, as the father’s words still bleed into this scene from the previous one.
This produces an echoing effect, as if the memory remains alive and the words are haunting him in the present day. An L-cut isn’t only used between separate scenes – it can also help smooth the flow of action between shots.
3. J cut
A J cut is essentially the reverse of an L cut. J cuts continue showing the visuals from one clip while the audio from the following clip fades in. This is how a J-cut looks on a timeline, with a J placed over the cut for visibility.
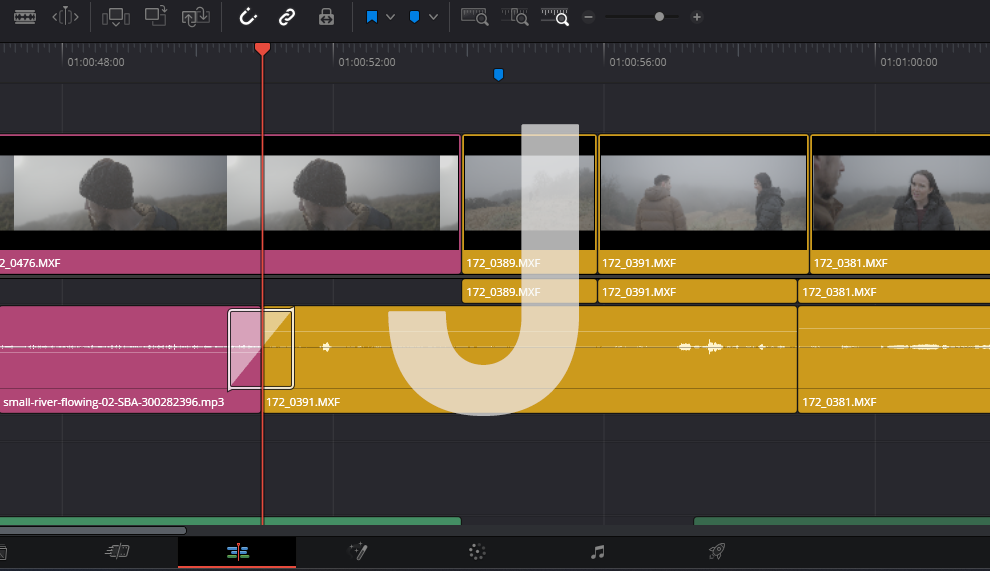
Both L-cuts and J-cuts can be added to smooth out a transitional scene that would have otherwise felt abrupt and are also used to elevate the filmmakers’ thematic intentions.
A J-cut can symbolize movement or the anticipation of what’s coming next. Imagine a scene where two high-school students decide to join the army. The two students look happy about the idea, but we want to show that they aren’t thinking about the reality of the decision. A J-cut could help undercut this moment by slowly bringing in the sound of warfare and screaming before cutting to a combat situation, which would make for a great juxtaposition cut.
There’s an excellent example of this at the beginning of Saving Private Ryan. The camera slowly zooms in on the main character kneeling at a gravesite as the sounds of the ocean fade in. The sounds continue as the shot cuts to waves crashing on a Normandy beach on D-Day.
4. Match cut
Match cuts link two shots that share a common visual element, whether it’s color, a shape, or even an action. One common approach with a match cut is to visually align an element within the composition between the two shots: think a shot of the moon cutting into a shot of a basketball, where the outlines of the spherical shapes match perfectly.
Perhaps the most famous example of a match cut is right at the beginning of the film 2001: A Space Odyssey, where a caveman throws a bone in the air, and it becomes a spaceship floating against a blackened sky in the next scene.
Match cuts are used to create juxtaposition and evoke emotion from the audience. In this example, we’re being shown a direct evolution of the primate species, from bone wielder to space explorer.
While not used frequently, you will find that match cuts will work wonders to create a visual and ideological connection between two sequences. But as Walter Murch likes to note, the goal of editing is to be invisible. A match cut, however, draws attention to the edit and can pull the viewer out of immersion, as it directly asks the audience, “What’s the correlation here?”
5. Cutting on action
Filmmaking is a meticulous process that can go wrong at nearly every turn. It’s no coincidence that YouTube is filled with thousands of lists and videos spotting errors in films that have cost hundreds of millions to produce. One of the core issues in filmmaking is continuity: ensuring that moments from one shot organically flow into the next, and so on.
Cutting on action is one simple way editors can ensure fluidity throughout the edit. This technique involves cutting between shots as a character or object moves across them.
For example, if a character reaches out to open a door in a close-up shot, and then we cut to a wide shot, we want the character’s hand to be in the same position as the door begins to swing open in the close-up. That way, when the door opens, it feels like a single, smooth motion. Cutting on action creates a sense of rhythm and organic movement within the scene.
This scene in Kill Bill shows excellent examples of cutting on action through movement as the two characters fight.
6. Jump cut
A jump cut can often get confused with a match cut, as both edits happen abruptly and concisely bring the edit to the viewer’s mind. The difference between the two is how they’re used – while the match cut introduces thematic and meaningful moments, the jump cut is primarily used to disorient the audience deliberately, indicate a quick passage of time, or create the sense that something is amiss.
For example, let’s say we have a character waiting for an important interview in a seating area. If we want to convey a significant passage of time in a single moment, we could use a jump cut from and back to the same angle. In the second shot, subtle changes like different lighting, a change in the time on the wall, and the character appearing more sluggish, would clearly signal that time has passed.
This example from Schindler’s List uses varying visual cues to the passage of time through jump cuts, like:
- Schindler’s positioning
- The different secretaries
- The workings in the background are progressing with their job
- The sunlight moving across the wall
With video editing, jump cuts are a popular technique to use with social media content, especially tutorials or recipes.
7. Transitions
Transitions are the connective tissue between scenes or shots. Very often, transitions are barely noticeable. But other times, you can get creative with transitions and use them as a storytelling aid.
- Fade: One example of a transition effect is a fade to black, which you can use to denote a sharp tonal shift between scenes. Use it after a particularly emotional or action-heavy sequence to add a sense of closure before the next scene.
- Dissolve: You can use a dissolve transition effect in film editing to indicate a flashback sequence, a character’s memory, or a look into their thoughts. In a dissolve transition, a clip’s image slowly dissolves into the next scene.
8. Parallel editing
One of the fundamental benefits of film over theatre and stage plays is its ability to transport viewers to multiple locations within a single continuous scene. While this may seem like a standard editing technique, moving between various locations within one sequence and having them play out simultaneously is called parallel editing, also known as cross-cutting.
In action films or when following two distinct parties, showing one sequence in full before the other can spoil the tension, and honestly, wouldn’t make much sense given the film’s linear format. Cross-cutting allows both sequences to play out at the same time, speeding up the flow of events.
A good example is the scene in Ferris Bueller’s Day Off that cuts back and forth between the truant title character racing home and his suspicious parents trying to catch him in a lie.
When implementing cross-cutting, it’s ideal first to edit each sequence fully, then bring them into your timeline and start intercutting between the two. In this stage, careful timing and rhythm in the cuts help maintain tension and will push the sequence forward.
Remember, with cross-cutting, time is always moving forward in both sequences, so you don’t need to go back to where the cut ended in the previous sequence. Use this to your advantage to cut out monotonous elements of the sequences.
9. Cutaway shots and cut-ins
Cutaway shots can add context to a scene by temporarily taking the audience out of the action and showing them something that advances the story. For example, in a standard dialogue scene filmed with two medium close-ups, if one character looks off to the right toward a window, a cutaway might show the city outside the window.
In the sequence below from Prisoners, the cutaway here would be the photocopy of evidence positioned on the floor.
In almost all uses of a cutaway, the purpose is to provide the audience with additional visual information. We could, of course, have the actor read out what’s looking at, but this breaks one of the core basics of good filmmaking, which is: show, don’t tell.
Additionally, cutaways can also add tension by raising the stakes in a scene by giving the audience information the characters aren’t yet aware of. Legendary director Alfred Hitchcock excellently breaks this down in the video below.
10. Montage
Montages are a classic film-editing technique you can use to show the passage of time, a character’s evolution, or a character getting something done. (Think of the training sequences in the Rocky movies or the shopping scene in Pretty Woman).
When it comes to a montage, there’s not a strict formula that you have to follow; in fact, they might be the most flexible form of editing. The core concept of the montage is to take a significant amount of time and truncate it down to just a few minutes on screen. As an editor, you can only work with what has been given to you, so a lot of the time, the concept of a montage has to be formulated in both the script and the production process itself.
Montages typically do not feature dialogue; instead, a film score or other music provides the only audio. Montages have become so well-known that they’re often parodied for comedic effect.
Use Storyblocks templates to make video content creation easier
With a fresh understanding of some standard editing techniques, you’re ready to jump into your next project. If you’re just beginning your editing journey, or if you simply want to speed up your process, we’ve got you. Storyblocks templates for Adobe After Effects, Premiere Pro, Apple Motion, and DaVinci Resolve provide everything you need to easily add stunning visual effects to your next video. Downloadable templates are just one of many ways Storyblocks can help you tell richer, more compelling stories.
Ready to learn more about how you can use Storyblocks to make your next project your best work yet? Get started by exploring our individual and business plans today.


