The soundscape of your video is just as crucial as its video counterpart. While stunning cinematography captures the eye, it’s the audio that truly immerses the viewer and guides their emotions.
Poorly balanced audio, with whisper-quiet dialogue or deafening music, can make your audience reach for the “mute” button or click away entirely. Whereas a clean, well-mixed audio track improves viewer comfort and adds to the overall impact of your story.
In this guide, you’ll learn how to balance audio levels in Premiere Pro. We’ll focus on the core pillars of audio balancing: leveling, normalization, strategic mixing, and the time-saving magic of auto-ducking. If you want to learn more, check out our in-depth article about audio cleanup.
How to balance audio in Premiere Pro
A great video needs great audio. The clearest visuals can be undone by an audio mix that’s too loud, too quiet, or inconsistent. Here are the fundamental steps to achieve a clean and professional audio balance in Adobe Premiere Pro.
1. Organize your audio workspace
Before touching your volume levels, make sure you have a clearly organized timeline. Start by switching to the Audio workspace at the top of your interface.
If it isn’t there, press Window > Workspaces > Audio. This will bring up the Track Mixer and Essential Sound panel, which you’ll need later.
Next, split your audio clips onto dedicated tracks based on categories. A good layout to follow (depending on the amount of tracks you have) might be:
- A1-A2: dialogue and voiceover
- A3-A4: Sound effects (SFX)
- A5-A6: Music
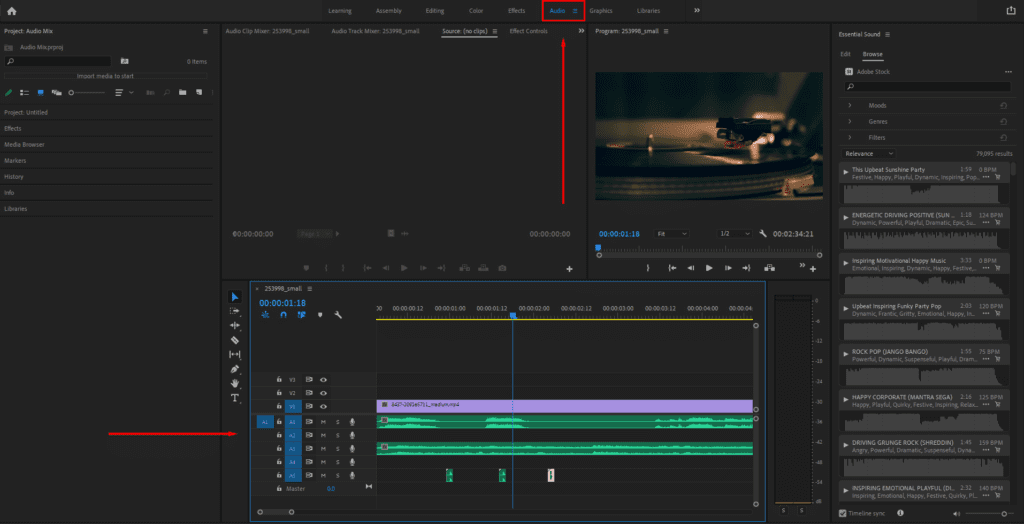
To keep things clear, rename your tracks by right-clicking each header and choosing Rename. You can also assign colors for quick identification under the Label menu. This little bit of housekeeping will save you from getting headaches as your project becomes more complex.
2. Normalize audio levels
Different microphones and recording environments mean your clips will probably come in at different volume levels. Normalization makes them all consistent. It automatically adjusts the peak amplitude of each clip, bringing everything to a uniform starting point. Here’s how to normalize audio in Premiere.
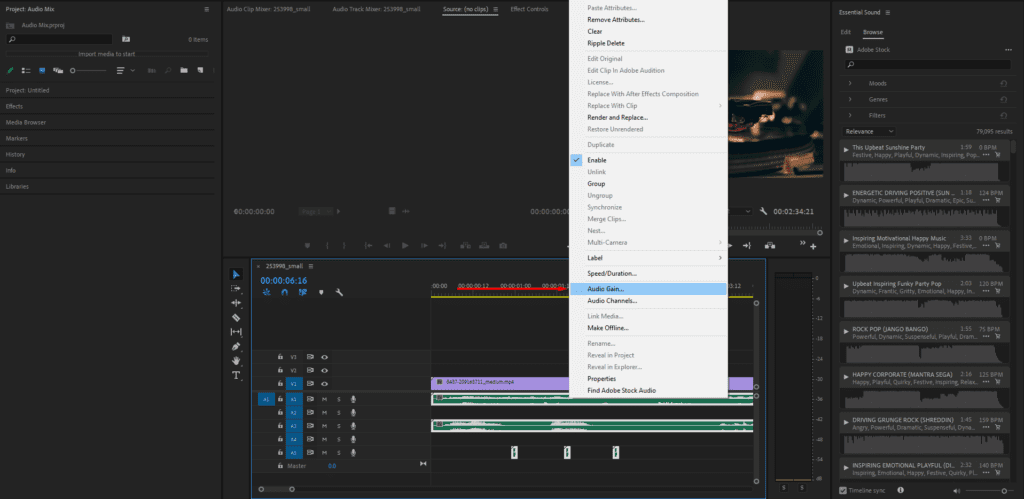
First, select one or more of your audio clips in the Timeline. Then, right-click on the clip(s) and press Audio Gain… (or press G for the keyboard shortcut).
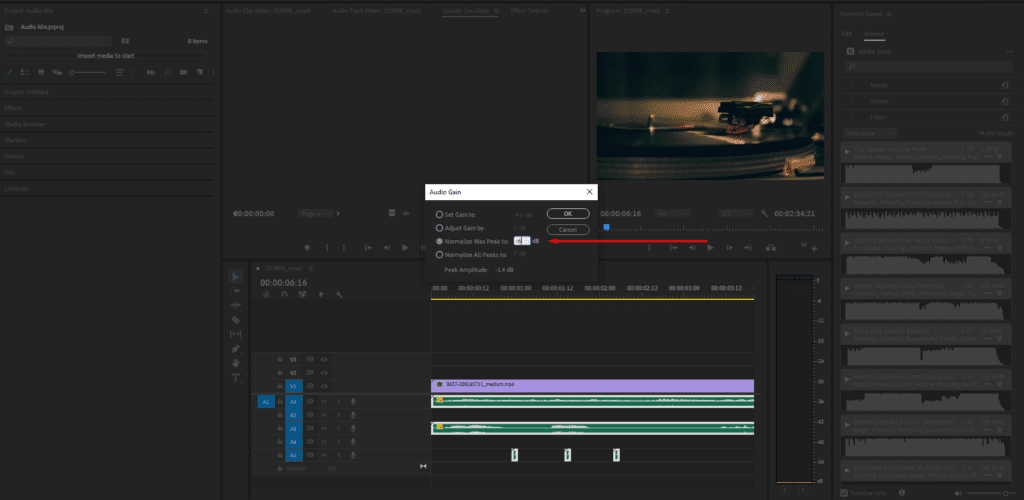
In the Audio Gain window, select Normalize Max Peak to: and set the value. A good starting point for web content is -6 dB. It’ll bring the loudest part of each clip to -6 dB, leaving you headroom for mixing other elements in later on. Press OK.
3. Level dialogue and music
Once you’ve normalized your audio clips, it’s time to level your dialogue and music so they work together. Luckily, learning how to level audio in Premiere is pretty straightforward. Two things to keep in mind are:
- Focus on dialogue first. Mute your music and sound effects tracks, then play through your dialogue. Listen for parts that are too loud or quiet. For web video, a good level is typically between -6 dB and -12 dB.
- Use music as support. Once your dialogue is consistent, then bring in the music. Its volume should sit comfortably beneath the dialogue (somewhere between -18 dB and -22 dB is a decent guide, depending on the track’s volume of course).
To manually adjust levels, select the Pen Tool (P) and click on the thin volume line that runs through the center of your audio clip. This creates a keyframe. Add at least two keyframes to create a volume change, dragging one up or down to adjust the level for that segment.
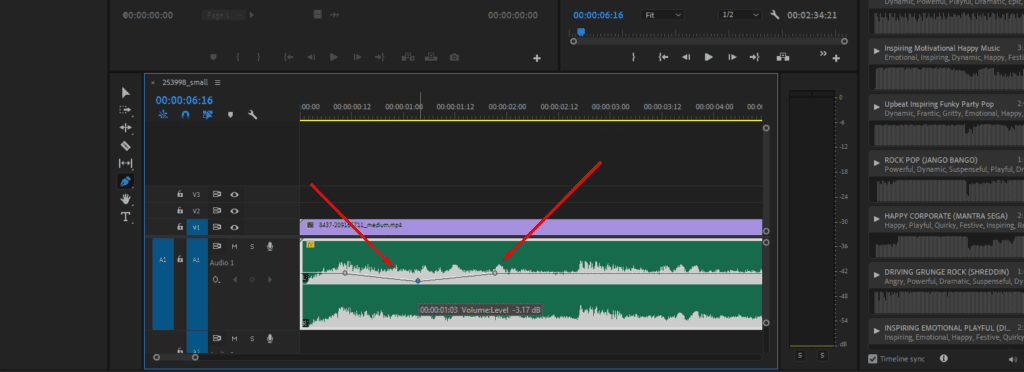
4. Use auto-ducking in Premiere Pro
Manually keyframing music around your dialogue can be tedious, especially in long-form content. Auto-Ducking is a massive time-saver that automatically lowers your music’s volume whenever dialogue is present.
Go back to the Essential Sound panel, select all of your dialogue clips in the Timeline, and choose Dialogue. Do the same for your music clips, but tag them as Music.
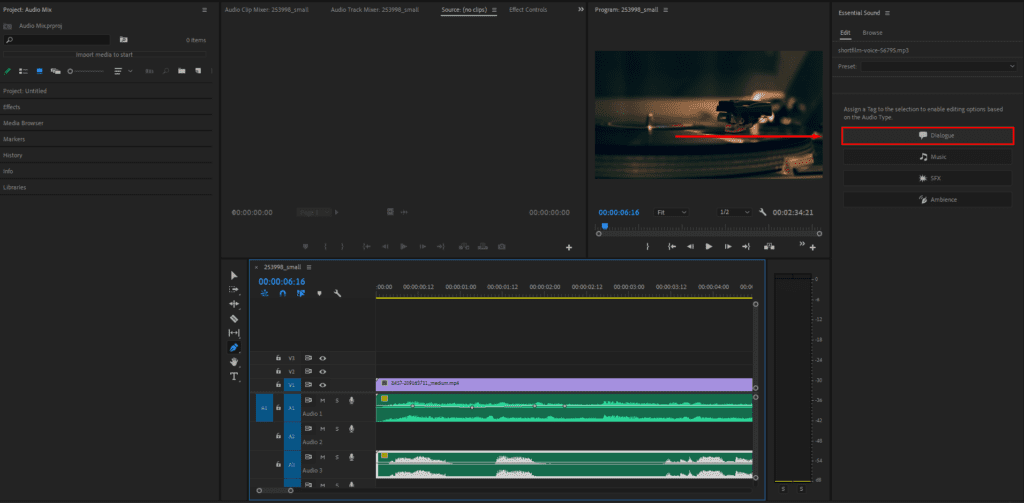
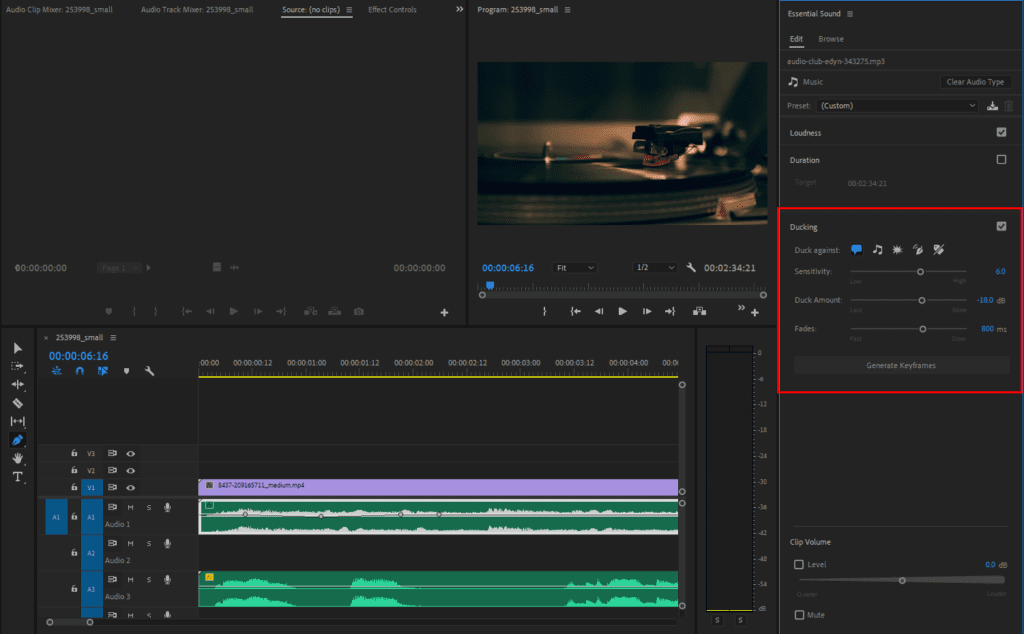
With the music clips still selected, the Essential Sound panel should now show ducking options. Check the box for Ducking and adjust these parameters:
- Duck against: Choose “dialogue” to tell Premiere what to listen for.
- Sensitivity: Determines how quickly the ducking reacts to dialogue.
- Duck amount: How much to lower the music volume (e.g., -18 dB is a good start).
- Fades: Fading out audio controls how quickly the music volume drops and returns to normal.
Finally, press Generate Keyframes. Premiere will analyze your timeline and automatically add all the necessary volume keyframes to your music track.
When to use manual keyframing: While auto-ducking is powerful, it might not be perfect for every moment. If the automatic results aren’t quite right, adjust the generated keyframes with the Pen Tool for more control.
5. (Optional) Simple EQ for balancing
Sometimes after leveling, your mix still sounds muddy. This happens when the frequencies of your dialogue are competing with similar frequencies in the music track. An equalizer (EQ) fixes this by carving out a space for the voice to sit in. Here’s how to equalize audio in Premiere.
Go to the Effects panel and select Audio Effects > Filter and EQ. Drag and drop Parametric Equalizer onto your music clip in the Timeline.
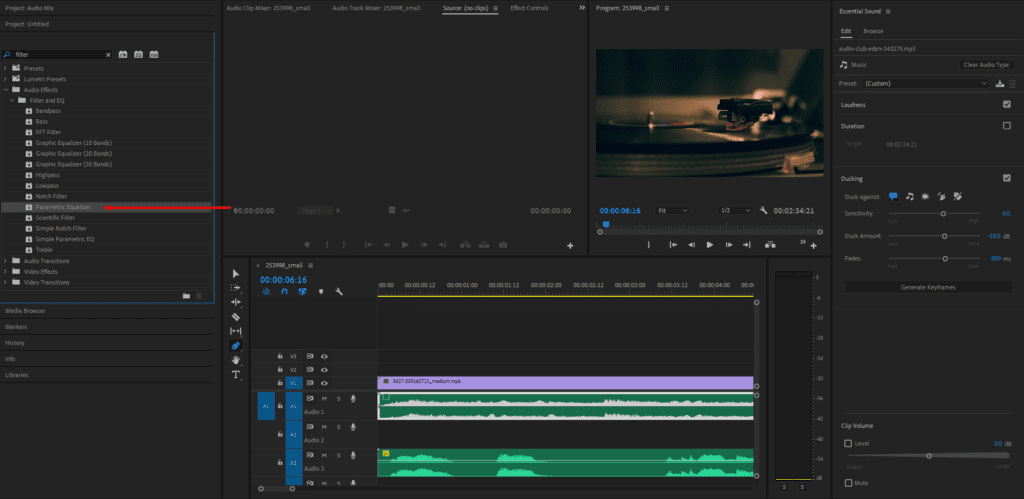
In the Effects Controls panel, click Edit… to open the main interface. The most important frequencies for vocal clarity are in the mid-range. Click on point 3 in the center of the graph and drag it downwards to create a gentle dip.
Adjust the settings below the graph for fine-tuning:
- Set the Frequency to be somewhere between 1 kHz and 4 kHz. This is the sweet spot for most voices.
- Adjust the Gain to lower the volume. A cut of -3 dB to -6 dB is usually enough.
- Widen the Q (Bandwidth). A wider Q value (a lower number) creates a broader, more natural-sounding curve that doesn’t sound like you’ve simply cut a hole in the music.
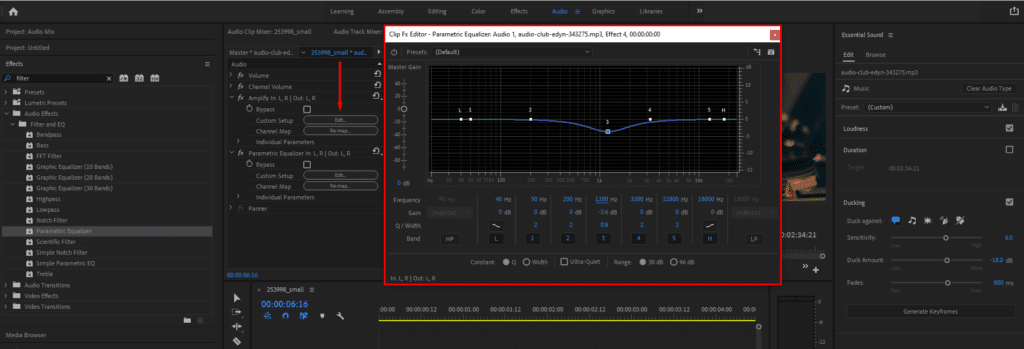
The goal isn’t to drastically change the music, but to make a subtle “scoop” in the frequencies where the human voice is most prominent.
I’ve found that you don’t need to be aggressive with this. A subtle, wide dip is far more effective than a deep, narrow cut. I might start with a gentle 3 dB cut centered around 2.5 kHz with a wide Q setting. I find that this clears up the “mud: without making the music track sound thin.
6. Exporting
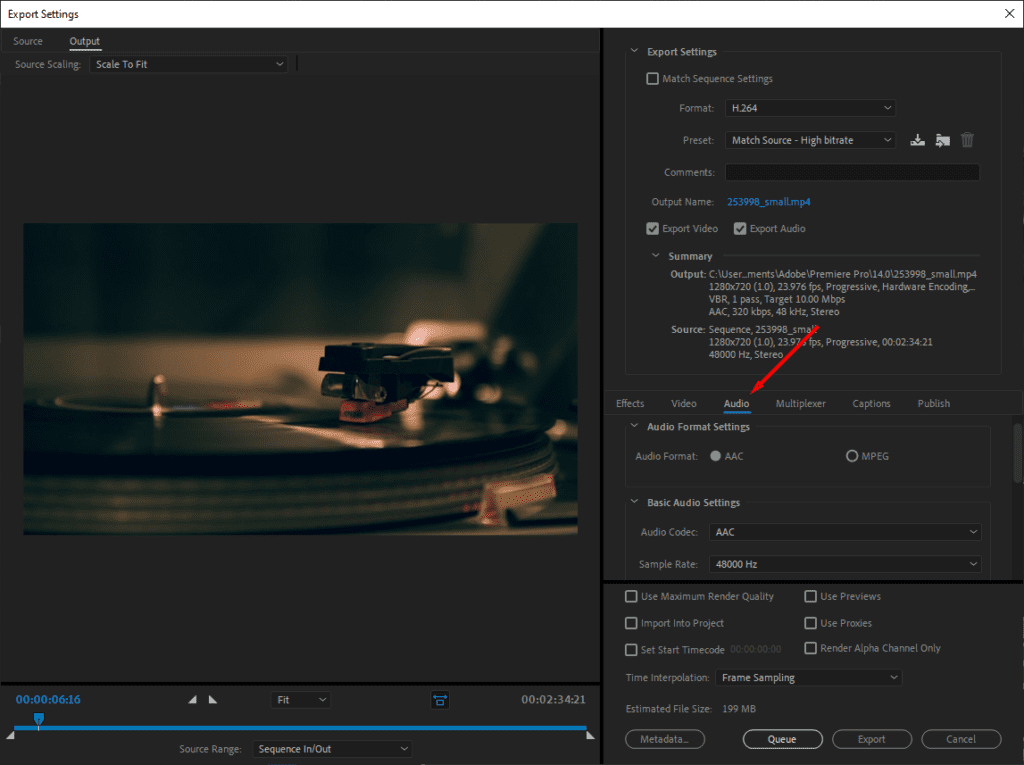
Now that you’ve done the work, it’s time to export your audio in a way that preserves its quality. Go to the Export tab and navigate to the audio settings. For most web platforms like YouTube, these are the best settings:
- Audio format: AAC
- Audio codec: AAC
- Sample rate: 48000 Hz
- Channels: Stereo
- Bitrate [kbps]: 320
If you’re delivering content for broadcast television, there are strict loudness standards. The Loudness Radar effect (found at Effects > Special > Loudness Radar) measures your final mix in Loudness Units Full Scale (LUFS) and so you can make sure it complies with these standards.
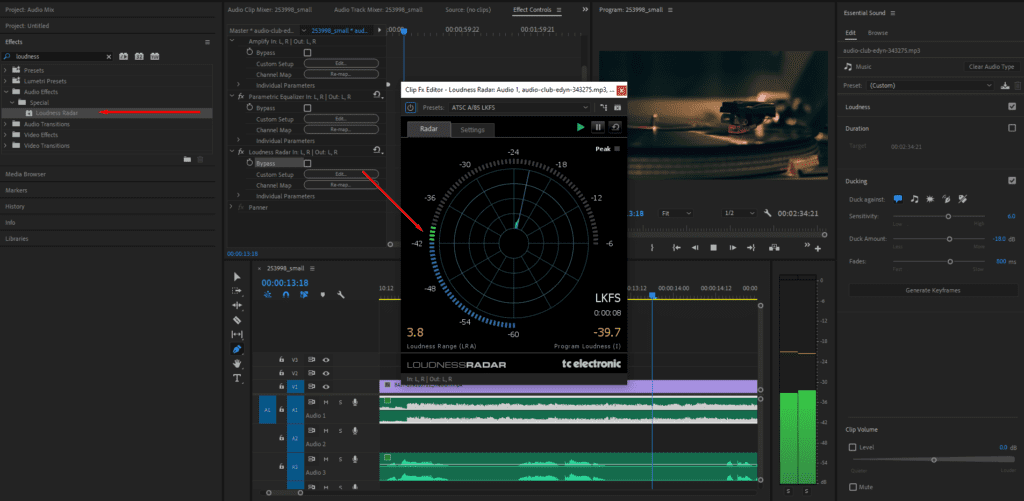
For web content, the standards are less rigid, but the Loudness Radar can still help. You can apply it to your master audio track to get an average loudness reading of your entire video. A good target for web content is around -16 LUFS.
Learn to do even more in Premiere Pro
Getting your audio mix right takes a series of small steps that add up to a polished final product. As you finish your mix, run through this final checklist:
- Is your timeline organized?
- Are your clips normalized?
- Is the dialogue clear and consistent?
- Does the music support the story?
- Is your final output level appropriate?
To take your Premiere Pro audio skills to the next level, learn how to convert stereo to dual mono, when to use WAV vs MP3, and the difference between lossy and lossless compression.
A great audio mix needs great source material. With a Storyblocks subscription, you get unlimited downloads of royalty free music and sound effects from a library that’s constantly growing. Find the perfect score, the right sound effects, and everything in between.
Even better, you can bring our full stock library of over 6 million assets right into Premiere Pro with the Storyblocks Plugin. Search, preview, and import clips without ever leaving your project timeline.


