Adobe Premiere Pro keyboard shortcuts are a powerful way to speed up your editing. Instead of relying on your mouse for every action, shortcuts let you execute commands faster using key combinations.
While getting started can feel overwhelming, learning a few keyboard shortcuts can make a big difference to your editing process, helping you save time and stay in the creative zone.
In this article, you’ll discover how to master Premiere Pro shortcuts, customize your workflow and improve your editing speed.
How to use keyboard shortcuts in Adobe Premiere Pro
Adobe Premiere Pro shortcut keys speed up your editing process by letting you perform actions without navigating menus. Using shortcuts is one of the fastest ways to sharpen your video editing skills and become a more efficient editor.
To access and customize shortcuts, go to Edit > Keyboard Shortcuts (on Windows) or Premiere Pro > Keyboard shortcuts (on Mac). You’ll see the Keyboard shortcuts editor, a visual layout of Premiere’s shortcuts. Search for any command using the search bar to see which button activates it.
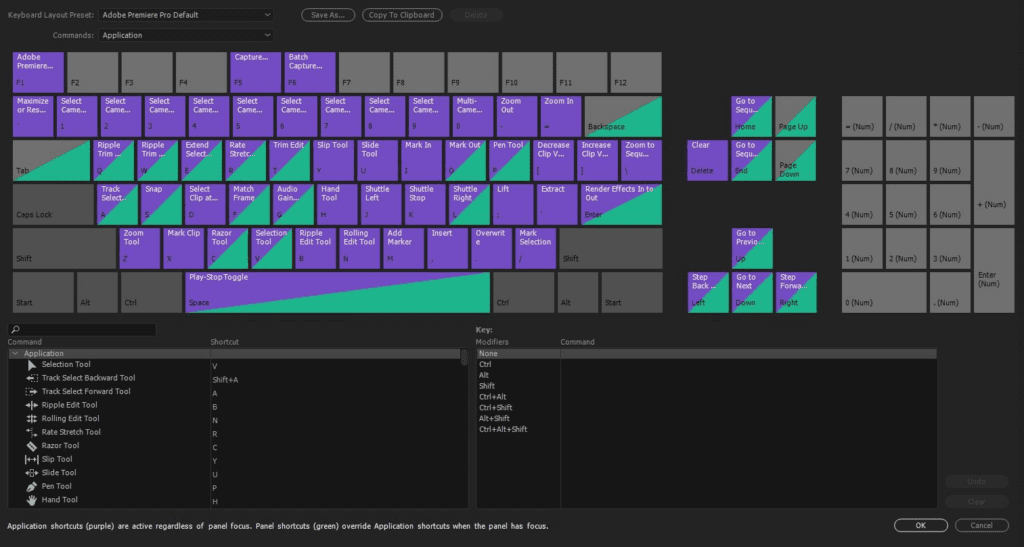
The shortcut editor uses different colors to distinguish between shortcuts:
- Purple keys: These are application-wide shortcuts, meaning they work across Premiere Pro regardless of which panel you’re working in.
- Green keys: These are panel-specific shortcuts, which only work when you select a specific panel (like the Timeline or Program Monitor).
- Green and Purple keys: These keys have both an application-wide and panel-specific function. Premiere Pro will prioritize the panel-specific shortcut if you select that panel. If you don’t select that panel, it’ll prioritize the application-wide shortcut.
If you’re unsure of a tool’s shortcut while editing, hover your cursor over the button. A tooltip will appear showing you the tool name and the keyboard shortcut (if available). Then, all you have to do is press that shortcut to activate the feature.
10 most useful keyboard shortcuts for Adobe Premiere Pro
Here are ten of the most Adobe Premiere Pro keyboard shortcuts to start using today:
Navigation and playback
- Shuttle controls (J, K, and L): Use these keys to quickly control playback. Press L to play forward, K to pause, and J to rewind. Tap multiple times to increase speed.
- Expand panel size (`, Backtick): Pressing this key maximizes the panel to full-screen size. It’s useful when you need a closer look at your timeline or preview window.
- Timeline navigation (Up and Down arrows): Jump between edit points in your clips by pressing the Up and Down keys. Toggling between A and V markers enables you to select the layer to the shuttle.
- Match frame (F): Loads your selected clip into the Source Monitor, helping you quickly preview footage.
Marking and trimming
- Mark In and Out points (I and O): Select a clip on your timeline. Press I to mark the In point and O for the Out point on the selected clip. Press Option + I / O(on Mac) or Ctrl + Shift + I / O(on Windows) to clear in and out points.
- Ripple delete (Shift + Delete): Removes a clip or gap and shifts everything else to the left, keeping your timeline in order without having to manually drag clips around.
- Split clip (Cmd / Ctrl + K): Splits a clip at the playhead. Assign this shortcut to one of the buttons on your mouse for quicker clip cuts.
Cutting and editing
- Undo (Ctrl / Cmd + Z): When you make a mistake or change your mind about an edit, hit the undo button to reverse your decision.
- Selection tool (V): Returns your cursor to the default selection tool. Useful after using another tool.
- Razor tool (C): Quickly switch to the razor tool to make cuts on the Timeline.
Your Premiere Pro keyboard shortcuts cheat sheet
Speed up your Adobe Premiere Pro skills and limit your use of the mouse with these keyboard shortcuts:
File keyboard shortcuts
| Command | Windows | Mac |
|---|---|---|
| Project/Production | Ctrl +Alt + N | Opt + Cmd + N |
| Sequence | Ctrl + N | Cmd + N |
| Bin | Ctrl + / | Cmd + / |
| Open Project / Production | Ctrl + O | Cmd + O |
| Browse in Adobe Bridge | Ctrl + Alt + O | Opt + Cmd + O |
| Close Project | Ctrl + Shift + W | Shift + Cmd + W |
| Close | Ctrl + W | Cmd + W |
| Save | Ctrl + S | Cmd + S |
| Save As | Ctrl + Shift + S | Shift + Cmd + S |
| Save A Copy | Ctrl + Alt + S | Opt + Cmd + S |
| Capture | F5 | F5 |
| Batch Capture | F6 | F6 |
| Import from Media Browser | Ctrl + Alt + I | Opt + Cmd + I |
| Import | Ctrl + I | Cmd + I |
| Export Media | Ctrl + M | Cmd + M |
| Get Properties for Selection | Ctrl + Shift + H | Shift + Cmd + H |
| Exit | Ctrl + Q | Cmd + Q |
Clip keyboard shortcuts
| Command | Windows | Mac |
|---|---|---|
| Make Subclip | Ctrl + U | Cmd + U |
| Audio Channels | Shift + G | Shift + G |
| Audio Gain | G | G |
| Speed/Duration | Ctrl + R | Cmd + R |
| Insert | , | , |
| Overwrite | . | . |
| Enable | Shift + E | Shift + Cmd + E |
| Link | Ctrl + L | Cmd + L |
| Group | Ctrl + G | Cmd + G |
| Ungroup | Ctrl + Shift + G | Shift + Cmd + G |
Edit keyboard shortcuts
| Command | Windows | Mac |
|---|---|---|
| Undo | Ctrl + Z | Cmd + Z |
| Redo | Ctrl + Shift + Z | Shift + Cmd + Z |
| Cut | Ctrl + X | Cmd + X |
| Copy | Ctrl + C | Cmd + C |
| Paste | Ctrl + V | Cmd + V |
| Paste Insert | Ctrl + Shift + V | Shift + Cmd + V |
| Paste Attributes | Ctrl + Alt + V | Opt + Cmd + V |
| Clear | Delete | Forward Delete |
| Ripple Delete | Shift + Delete | Shift + Forward Delete |
| Duplicate | Ctrl + Shift + / | Shift + Cmd + / |
| Select All | Ctrl + A | Cmd + A |
| Deselect All | Ctrl + Shift + A | Shift + Cmd + A |
| Find | Ctrl + F | Cmd + F |
| Edit Original | Ctrl + E | Cmd + E |
| Keyboard Shortcuts | Ctrl + Alt + K | Cmd + Opt + K |
Sequence keyboard shortcuts
| Command | Windows | Mac |
|---|---|---|
| Render Effects in Work Area | Enter | Enter |
| Match Frame | F | F |
| Reverse Match Frame | Shift + R | Shift + R |
| Add Edit | Ctrl + K | Cmd + K |
| Add Edit to All Tracks | Ctrl + Shift + K | Shift + Cmd + K |
| Trim Edit | Shift + T | Cmd + T |
| Extend Selected Edit to Play head | E | E |
| Apply Video Transition | Ctrl + D | Cmd + D |
| Apply Audio Transition | Ctrl + Shift + D | Shift + Cmd + D |
| Apply Default Transitions to Selection | Shift + D | Shift + D |
| Lift | ; | ; |
| Extract | ‘ | ‘ |
| Zoom In | = | = |
| Zoom Out | – | – |
| Next in Sequence | Shift + ; | Shift + ; |
| Previous in Sequence | Ctrl + Shift + ; | Opt + ; |
| Snap in Timeline | S | S |
| Make Subsequence | Shift + U | Cmd + U |
| Add new caption track | Ctrl + Alt + A | Opt + Cmd + A |
| Add caption at playhead | Ctrl + Alt + C | Opt + Cmd + C |
| Go to next caption segment | Ctrl + Alt + Down | Opt + Cmd + Down |
| Go to previous caption segment | Ctrl + Alt + Up | Opt + Cmd + Up |

Markers keyboard shortcuts
| Command | Windows | Mac |
|---|---|---|
| Mark In | I | I |
| Mark Out | O | O |
| Mark Clip | X | X |
| Mark Selection | / | / |
| Go to In | Shift + I | Shift + I |
| Clear In | Ctrl + Shift + I | Opt + I |
| Clear Out | Ctrl + Shift + O | Opt + O |
| Clear In and Out | Ctrl + Shift + X | Opt + X |
| Add Marker | M | M |
| Go to Next Marker | Shift + M | Shift + M |
| Go to Previous Marker | Ctrl + Shift + M | Shift + Cmd + M |
| Clear Selected Marker | Ctrl + Alt + M | Opt + M |
| Clear All Markers | Ctrl + Alt + Shift + M | Opt + Cmd + M |
How to customize keyboard shortcuts in Premiere Pro
You can easily customize Premiere Pro’s shortcut keys to match your editing style and workflow. Press Ctrl + Alt + K (on Windows) or Cmd + Opt + K (on Mac) to open the keyboard shortcut editor.
To change a shortcut, click on the current key assignment and type the new key you want to use.
For instance, if you want to change the Type tool’s shortcut, look for “Type” in the search bar. Then, click in the Shortcut column and press the new key you’d like to assign for that application.
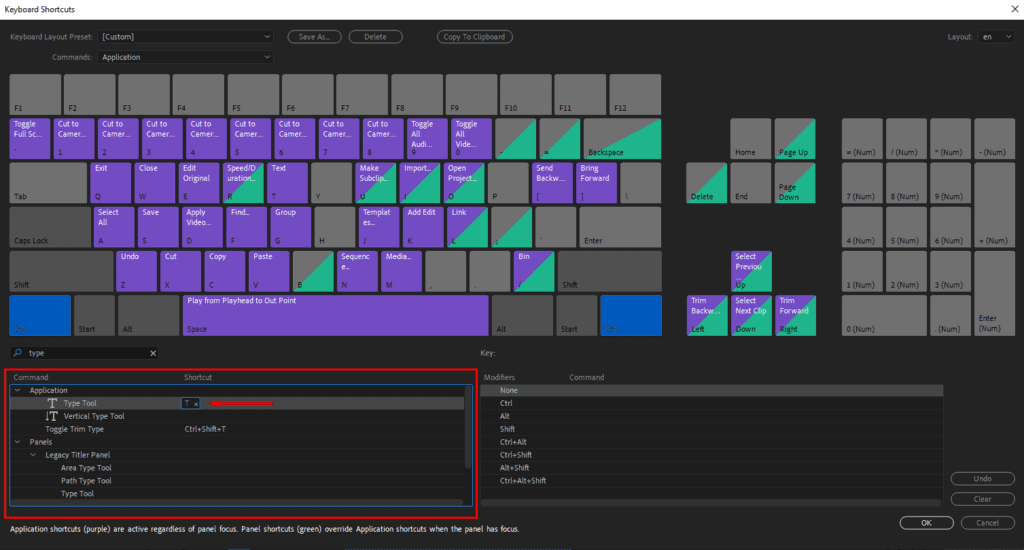
If you assign a key that’s already assigned to another command, Premiere Pro will warn you. You can then choose to reassign the key to one that you aren’t using or assign a modifier combo (e.g. Shift or Option) to avoid overlap.
I wouldn’t recommend leaving both assigned unless you use them in separate contexts (i.e., one of the uses is panel-specific).
How to get the most out of your Premiere Pro keyboard shortcuts
As you customize your Premiere Pro shortcuts, make your workspace as intuitive as possible. Here are three smart ways to personalize your setup:
Keep your most-used shortcuts within reach
Remap your most frequent commands to keys you can hit without lifting your hand from the home row. This minimizes hand movement and helps you edit faster without having to think about it every time.
“Personally, I set all of my most-used commands within reach of my left hand so I never have to move my hand position. Whether you’re using one hand on the keyboard and one on the mouse, or going mouse-free, small adjustments like this can save a lot of time.” — Kyle Miller, Video Production Manager at Storyblocks
Learn from other editors
Talk to other editors and check community forums to find new shortcut ideas. You might discover smarter ways to handle common tasks or uncover powerful commands you haven’t heard of.
One thing I discovered while looking for efficient shortcuts was mapping “Zoom in” and “Zoom out” to thumb buttons on my mouse. It makes it much easier to quickly fine-tune adjustments in the sequence, without reaching across the keyboard to the = button.
“There’s always new tricks to learn and I promise it will save you way more editing time than you think.” — Rachel Kisella, Freelance Video Editor
Replace tools you never use
Every editor has a different process. If there are tools you never use, swap these out for tools you actually do use – especially if they’re in an easily reachable location. It’s more important to create a system that works for you than to learn Premiere’s default layout.
Use Storyblocks templates to make video content creation easy
Premiere Pro’s keyboard shortcuts can save you hours when editing, but having the right tools from the start makes the entire editing process more enjoyable.
Storyblocks provides an extensive range of Premiere Pro templates that help you edit smarter and faster. From LUTs to intros and slideshows, you can find templates for every project on top of getting unlimited downloads of over 8 million royalty free, high quality stock assets. Browse our library and check out our Premiere Pro plugin to see how Storyblocks can speed up your next project.
Editor’s Note: This post has been updated with additional information. It was originally published on October 18, 2022.